Notarizing certificates via Node-Red
Update: We have created a simple, custom S1SEVEN node that can significantly simplify this workflow, see how to use and install it here. While more complex to set up, this article exposes more implementation details and can be extended or customized later. For most use cases, we recommend installing and using our custom nodes.
Introduction
Now that we have seen how to validate certificates in part 1 of this series, we will learn how to notarize certificates via Node-Red and the S1SEVEN API.
This article will explain each step of the flows required to notarize a certificate. Instructions on how to import these pre-made flows will be made available near the end of the article under the heading Importing pre-made flows.
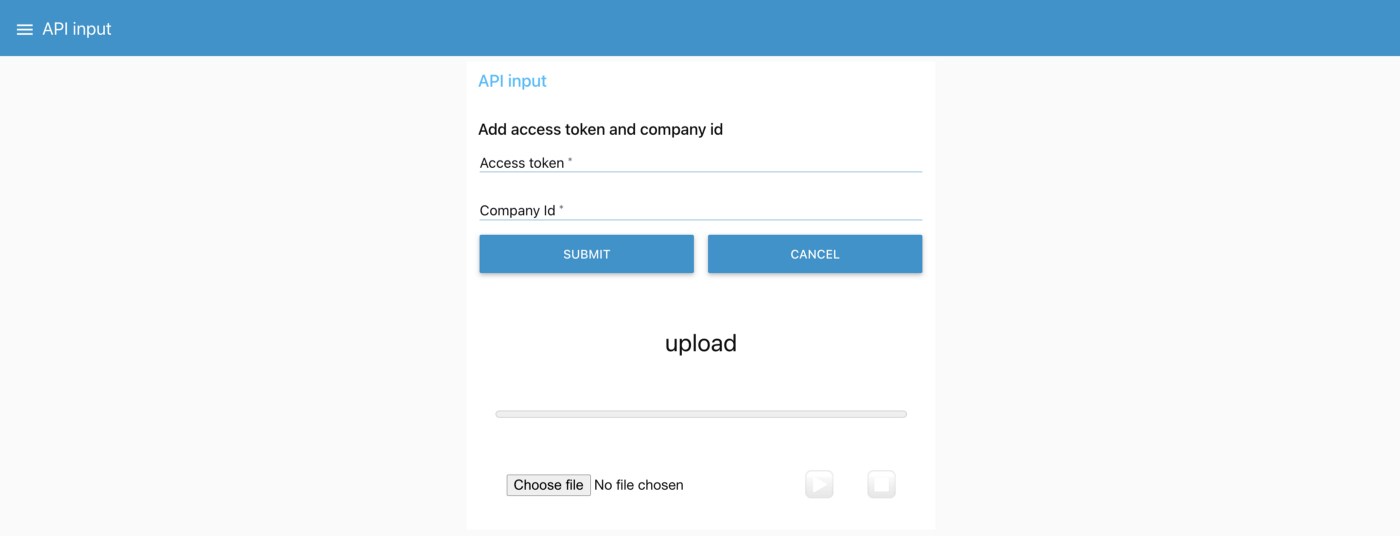
Notarizing certificates requires that a user be authenticated. First, we will add a new section to the UI that allows users to input their access token and company id.
Allow access token and company id to be input via the UI
The flow that makes this possible is very simple:
Flow that makes minimum and maximum values available globally
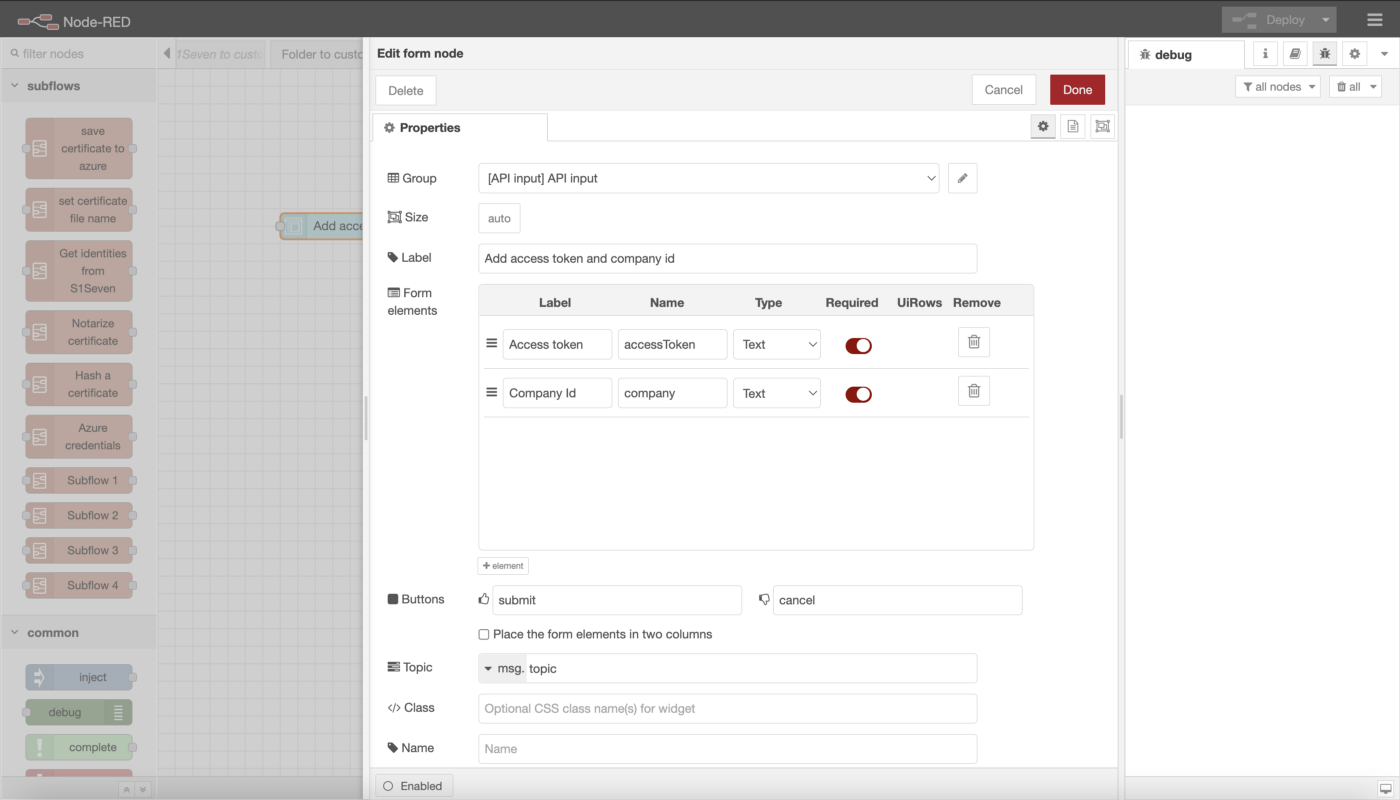
We add a form element to the UI that allows the access token and company id to be input. Double-clicking on the light-blue node shows us the configuration details:
Input form configuration
The important part of this is the Form elements section. The label defines what the user sees on the UI. Name defines where the data will be stored. For example, the Access Token will be stored at msg.payload.accessToken, while the Company Id is stored at msg.payload.company.
By toggling Required, the user cannot submit the form until all the required elements have been filled in.
Once the user fills in and submits the form, msg.payload is sent to the Set min and max globally node, which contains the following code:
global.set('accessToken', msg.payload.accessToken);
global.set('company', msg.payload.company);return msg;
This code sets two properties on the global object, allowing them to be accessed in other flows. It sets the global.accessToken property and the global.company property to the values the user input via the form.
Then the return msg; line passes the msg object to the next node, which is printed to the debug console.
Getting your access token
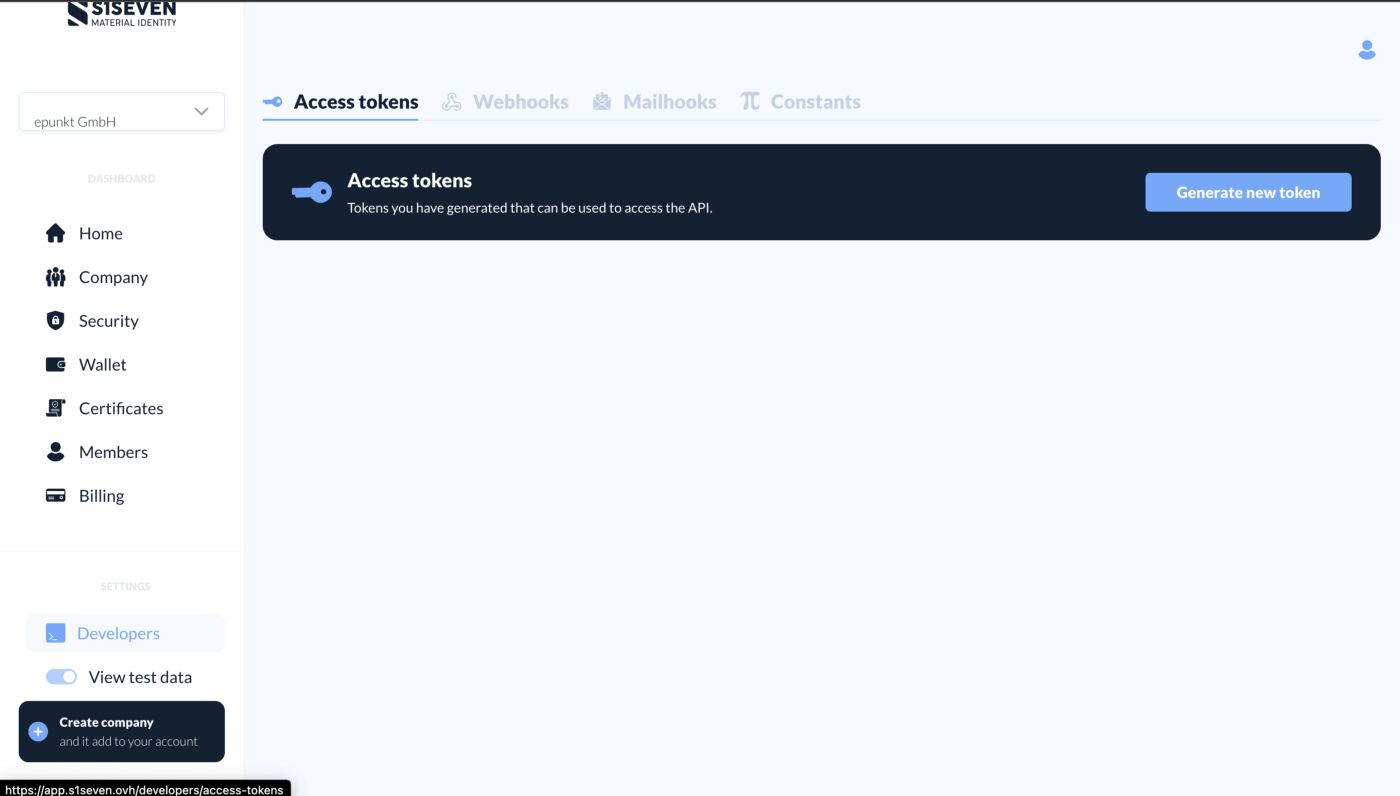
To find the access token and company id, go to https://app.s1seven.ovh/developers/access-tokens (you must be logged in to see this page) and click Generate new token.
S1SEVEN developer section
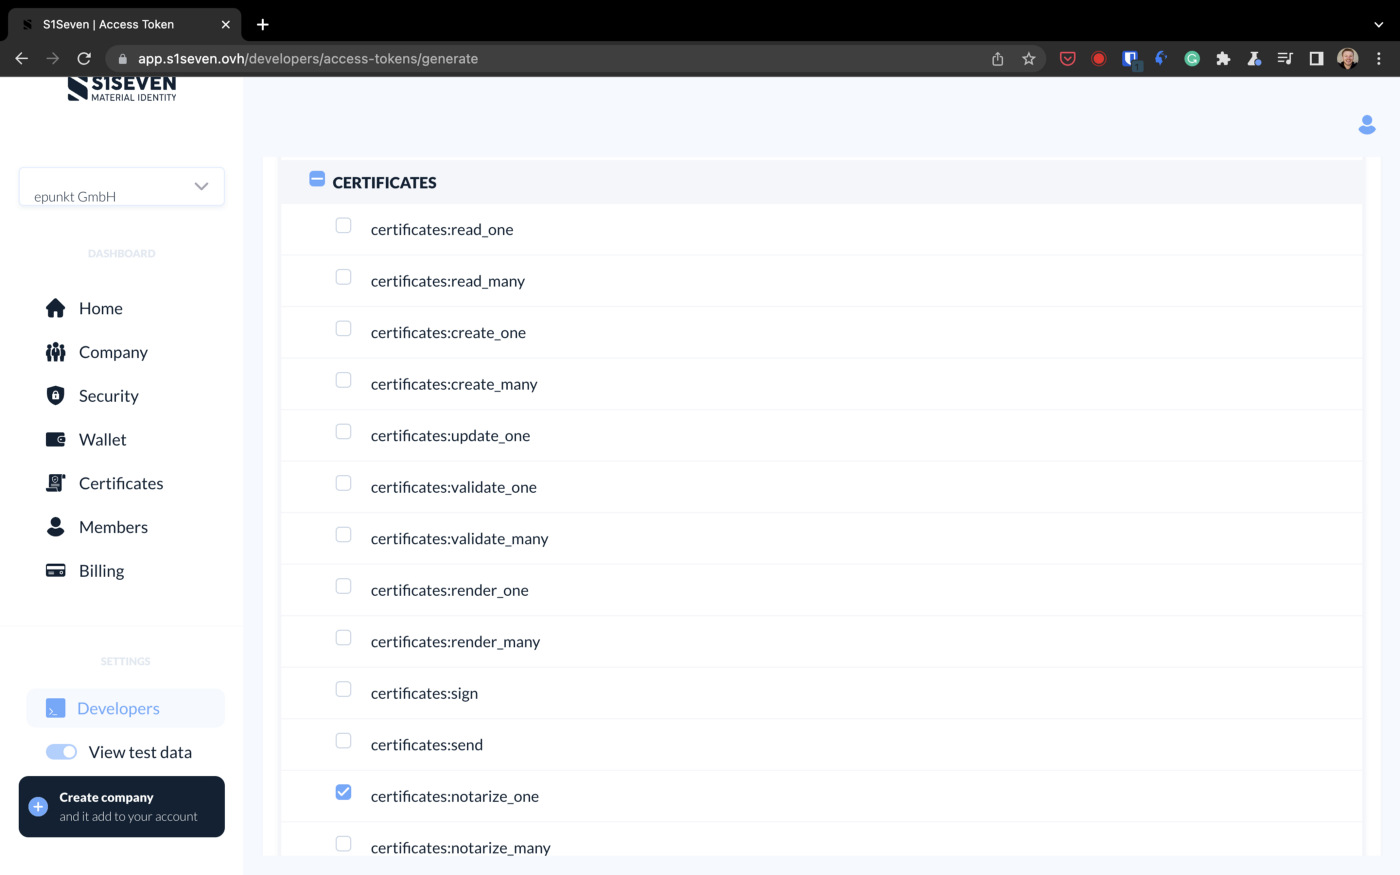
Add a descriptive name, such as “Node-Red certificate validation,” then in the scope section, scroll down, and select certificates:notarize_one and identities:read_many before hitting the Save button.
certificates:notarize_one
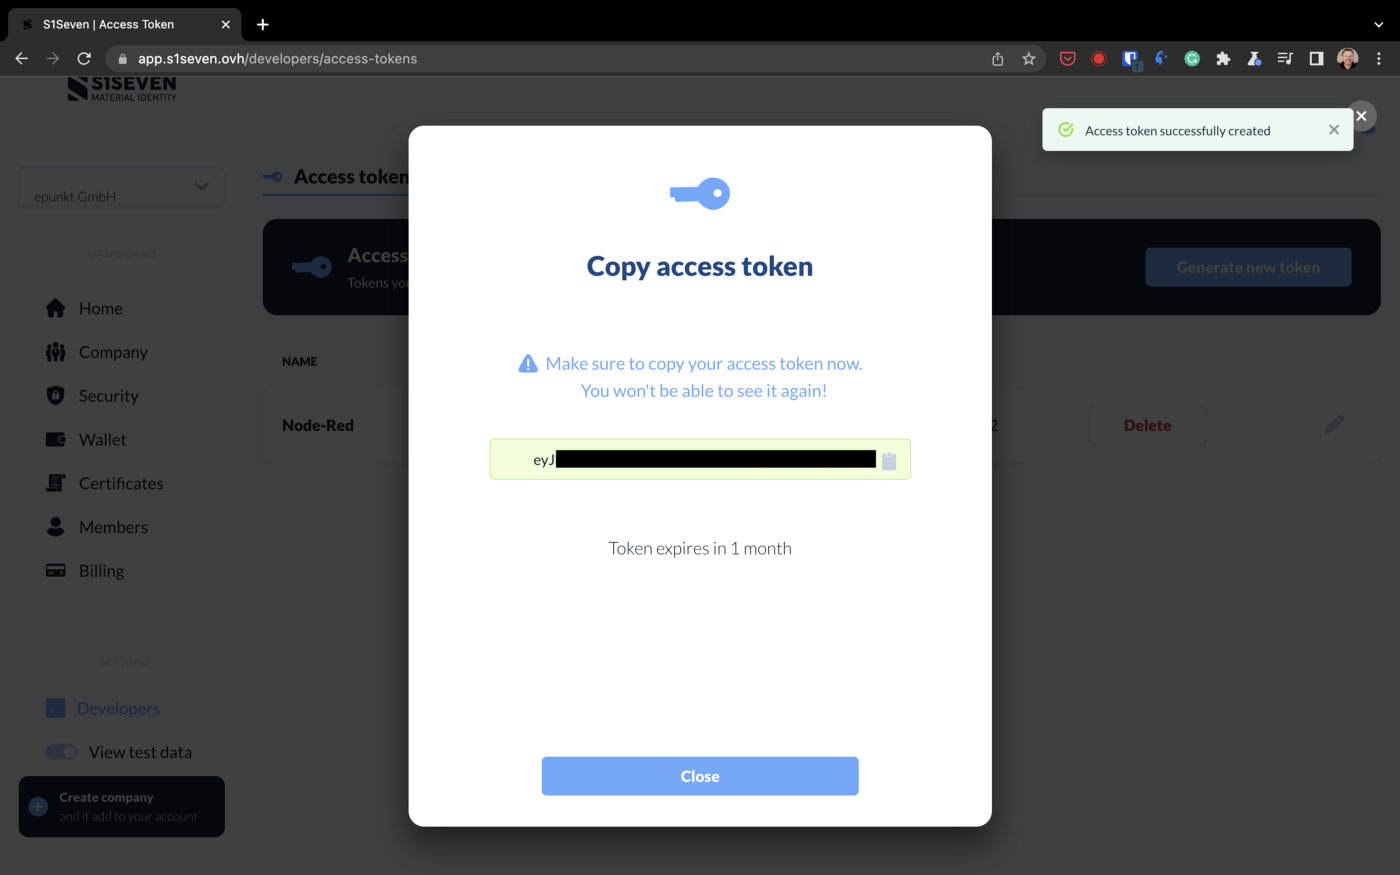
You should see the following screen:
Copy access token
You can only see this access token once, so save it somewhere safe. Be sure to keep this token private, as a third party could use it to notarize certificates on your behalf if they were given access to it.
Getting your Company ID
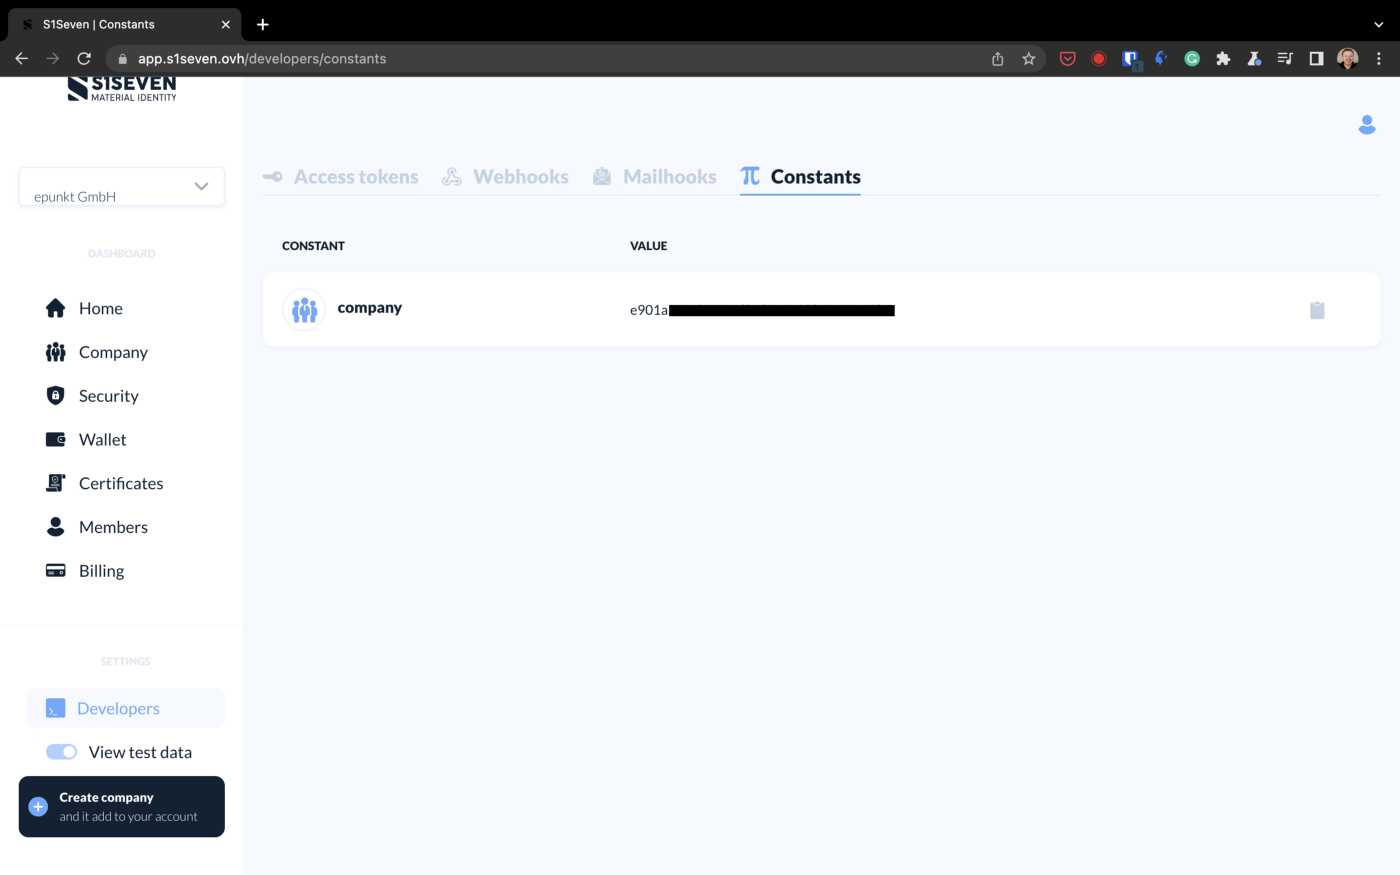
Then click Close, and open the Constants tab or go to https://app.s1seven.ovh/developers/constants. Here you should see your company id in the VALUE section. If you don’t have anything here, first create a company by going to the Company page on the left sidebar.
Getting your company id
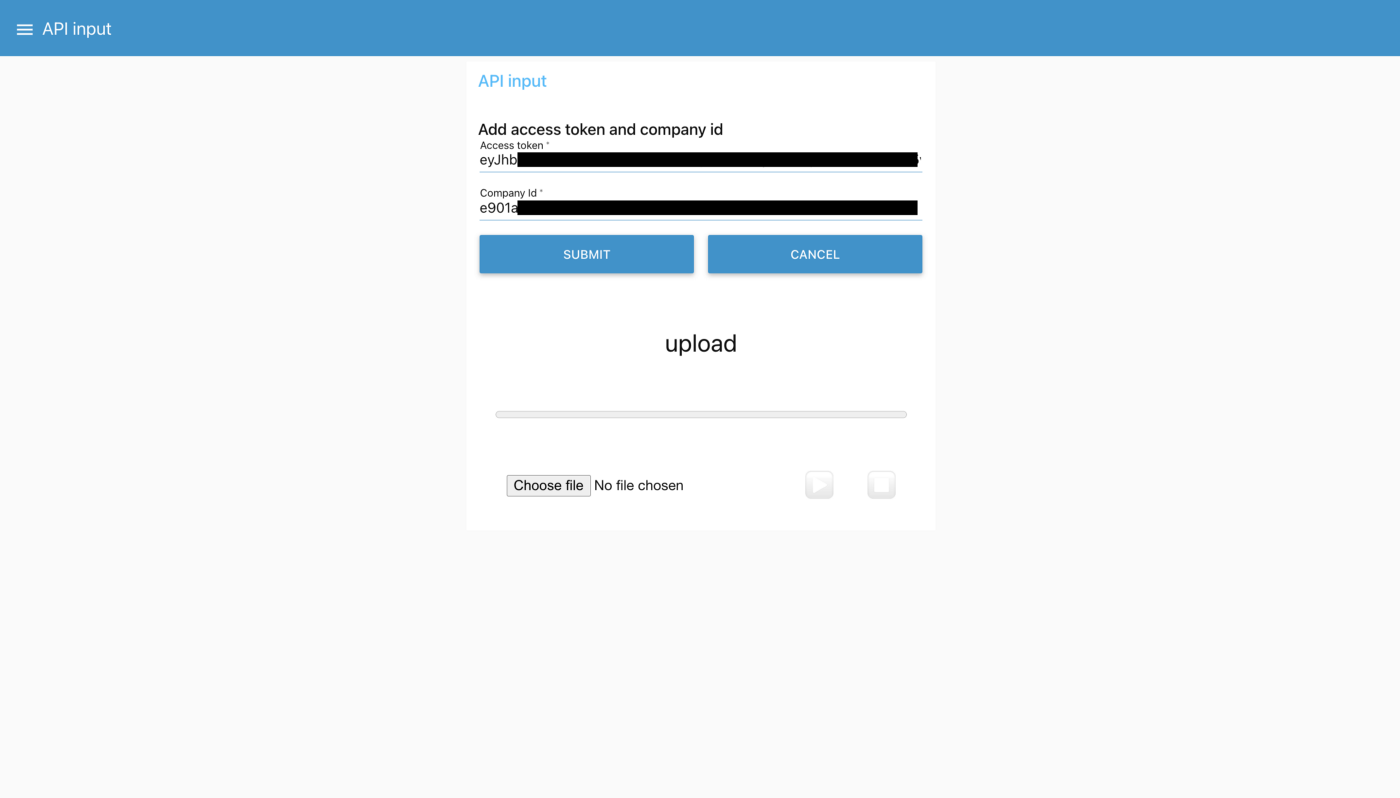
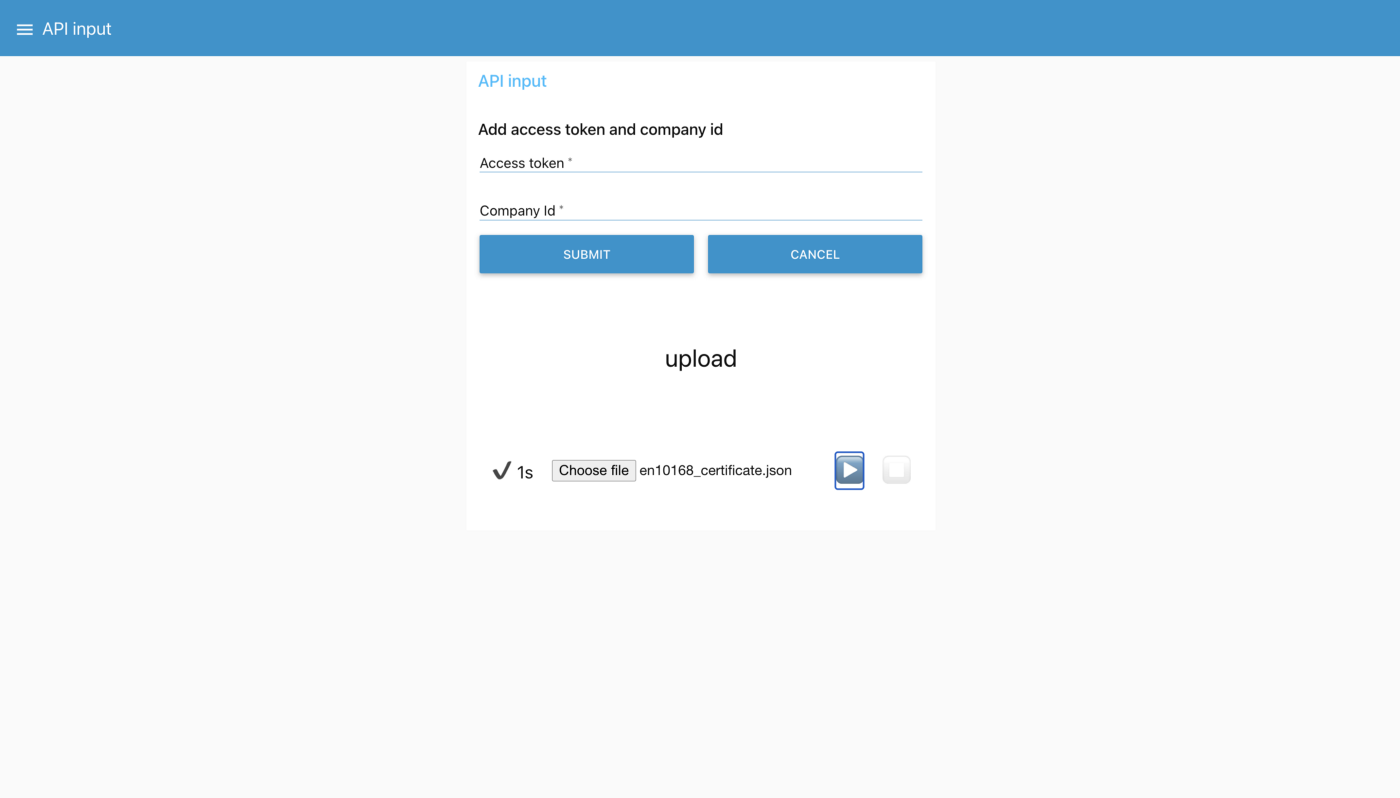
Copy the value, go to the Node-Red UI Dashboard (found by default at localhost:1880/ui), and paste in the access token you generated as well as your company id:
Input your access token and company id
Hit the Submit button and go back to your node-red flows page. If everything worked correctly, you should see the values you input printed on the right sidebar in the debug section:
Values have been correctly added
Note that this process only needs to be done once, the access token and company id will persist until the server (Node-Red) is turned off. Now that you have the access token and company id set, you can get started on notarizing the certificate.
Notarizing a certificate
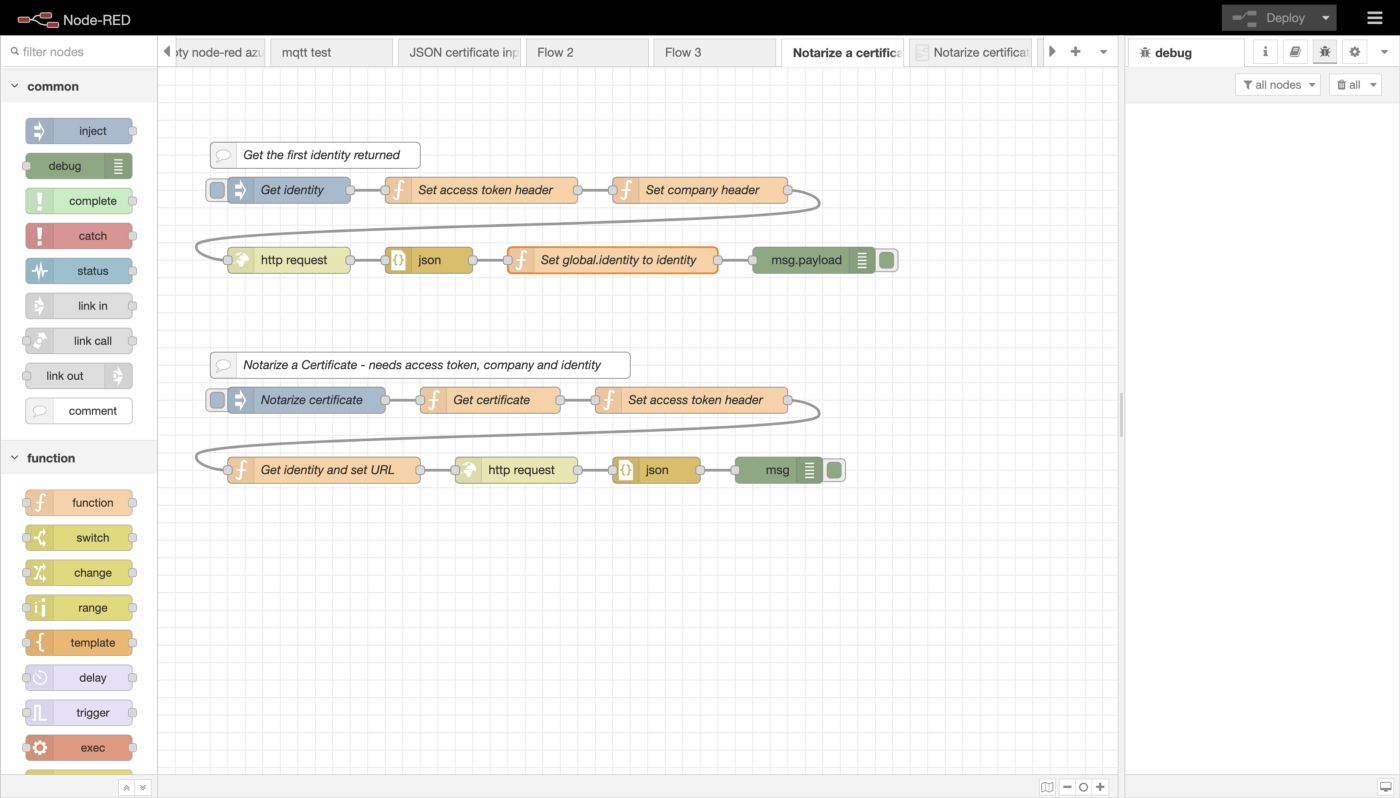
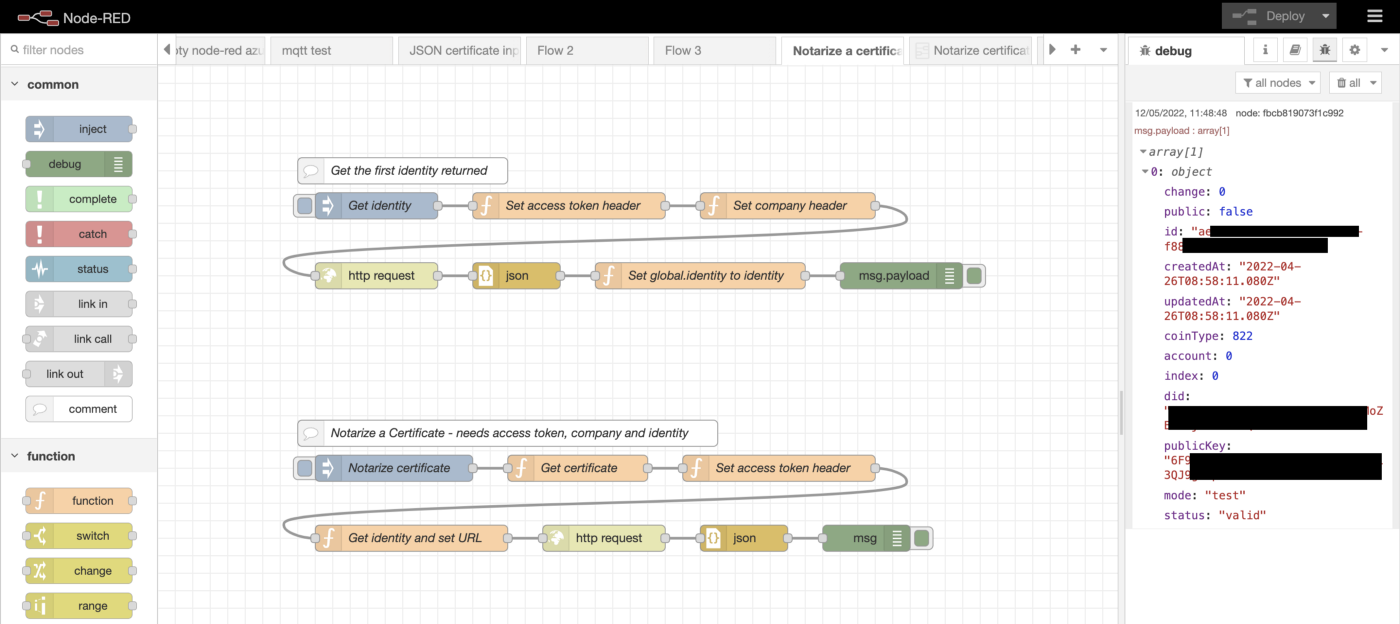
In addition to the access token and company id, we also need an identity to notarize a certificate. This flow has two main parts; the first is used to get and set an identity for use with the notarization, and the second part is used to notarize a certificate.
Notarize a certificate flows
Getting an identity
Just like with the access token and company id, the identity flow only needs to be run once, as it will set the identity as a property on the global object.
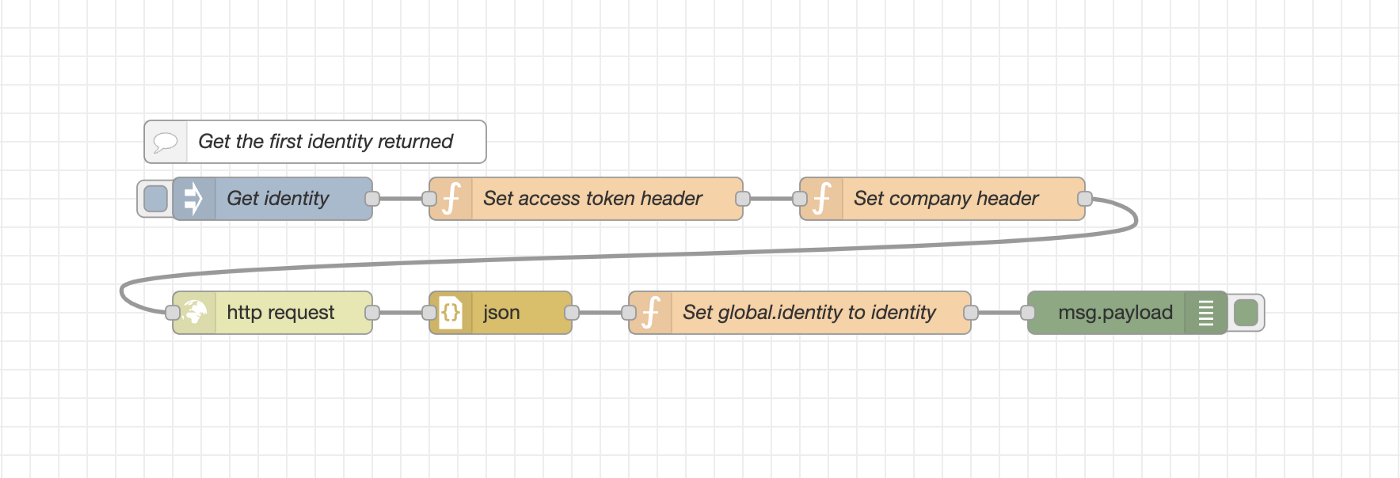
Flow to get an identity
When we send an HTTP request that requires authentication, as this one does, we need to set Headers. A header allows you to send additional data alongside a document. In this flow, the nodes Set access token header and Set company header set the Authentication and company headers to be sent along with the main HTTP request.
Then, an HTTP get request is sent to http://app.s1seven.ovh/api/identities?mode=test. If the access token and company id are correctly set, a response will be received containing an array of your identities.
An array is a data structure that is like a container. In this context, the array will contain one or more identity objects.
In the nodeSet global.identity to identity, we take the id of the first identity by default and set it to the global property identity, making it available to other flows.
Finally, the contents of msg.payload are printed to the debug console, which, when expanded (by clicking on them), will look something like this:
The identity object sent by S1SEVEN
Notarizing a certificate
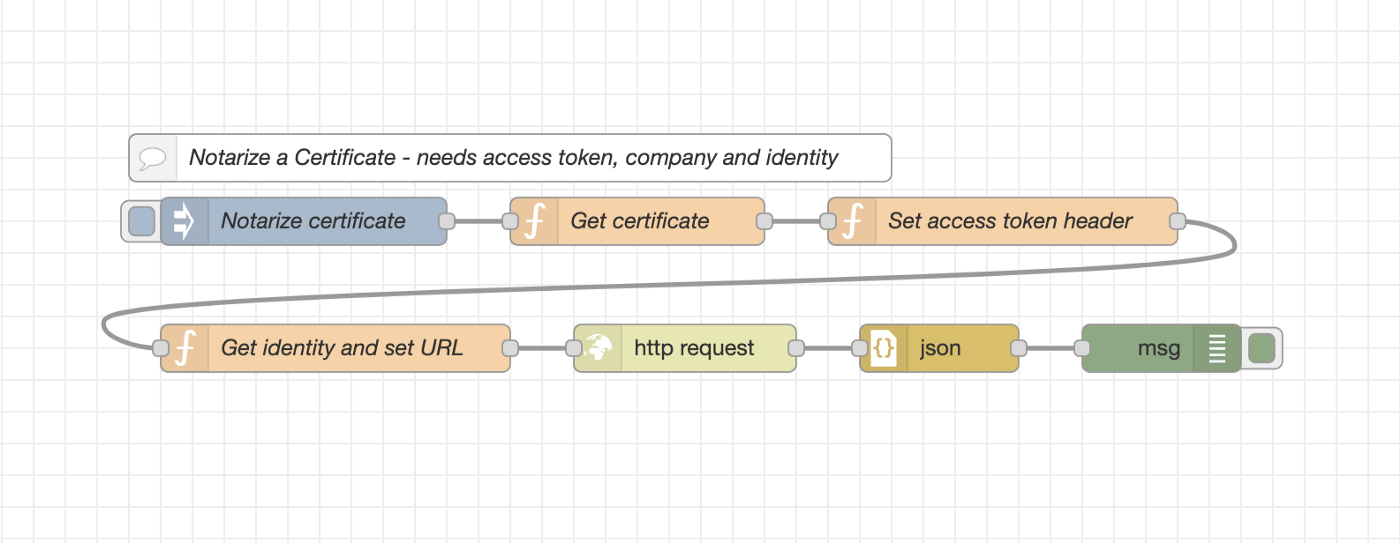
Now that we have our identity set, we can finally notarize certificates using the following flow:
Notarize certificate flow
This flow is relatively similar to the previous one. In Get certificate, we retrieve the certificate from global.certificate and store it at msg.payload. If you didn’t upload a certificate earlier in Part 1 of this series, now is the time to do it from the UI. Remember that whatever certificate is uploaded via the UI is set as a property of the global object, global.certificate.
Uploading a certificate
The node Set access token header sets the access token header to authenticate the HTTP request. The node Get identity and set URL is a little more complex, it contains the following code:
const identity = global.get('identity');if (identity) {
msg.url = `https://app.s1seven.ovh/api/certificates/notarize? identity=${identity}&mode=test`
return msg;
} else {
node.warn('No identity available, get the identity first');
}
On the first line, we get the value of our identity from the global object and store it in a variable called identity.
We check to make sure that identity contains a value using an if statement, and then we set msg.url to `https://app.s1seven.ovh/api/certificates/notarize? identity=${identity}&mode=test`.
You may wonder why we set the URL here in the code instead of in the HTTP request node like we usually do. We do it in this way because the identity has to be sent as part of the URL instead of as a header. Notice in the URL the expression identity=${identity}. The syntax ${identity} means that the word identity will be replaced with the contents of the variable identity.
Once this happens, the URL will look something like “https://app.s1seven.ovh/api/certificates/notarize?identity=an3sdi2b-fd2f-1212-84c9-f02a29342e3b0&mode=test".
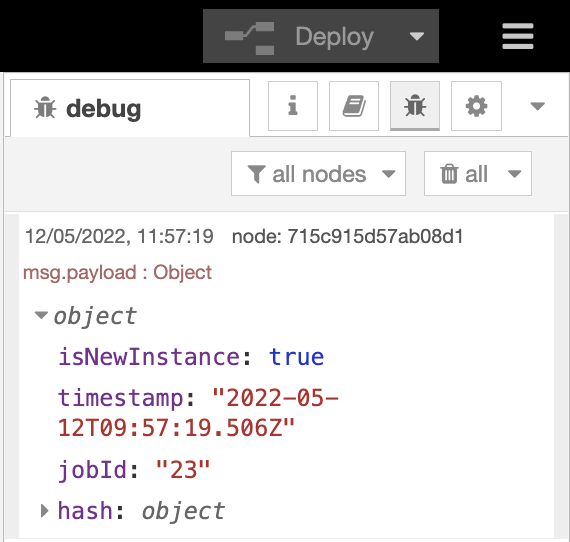
The http request node will then look at msg.url and send a request automatically to that URL. The response will be parsed to an object by the json node and finally, msg.payload will be printed to the debug console to the right. It looks something like this:
Response from S1SEVEN after notarizing a certificate
The most important part of the response for our purposes is the property isNewInstance. If the certificate is a new certificate that has not already been notarized, this will be set to true, otherwise, it will be set to false. Soon after, you should get an email stating that the certificate has been notarized on the blockchain!
Importing pre-made flows
As in Part 1 of this series, to simplify the process, our pre-made flows can be easily imported into Node-Red and modified if necessary.
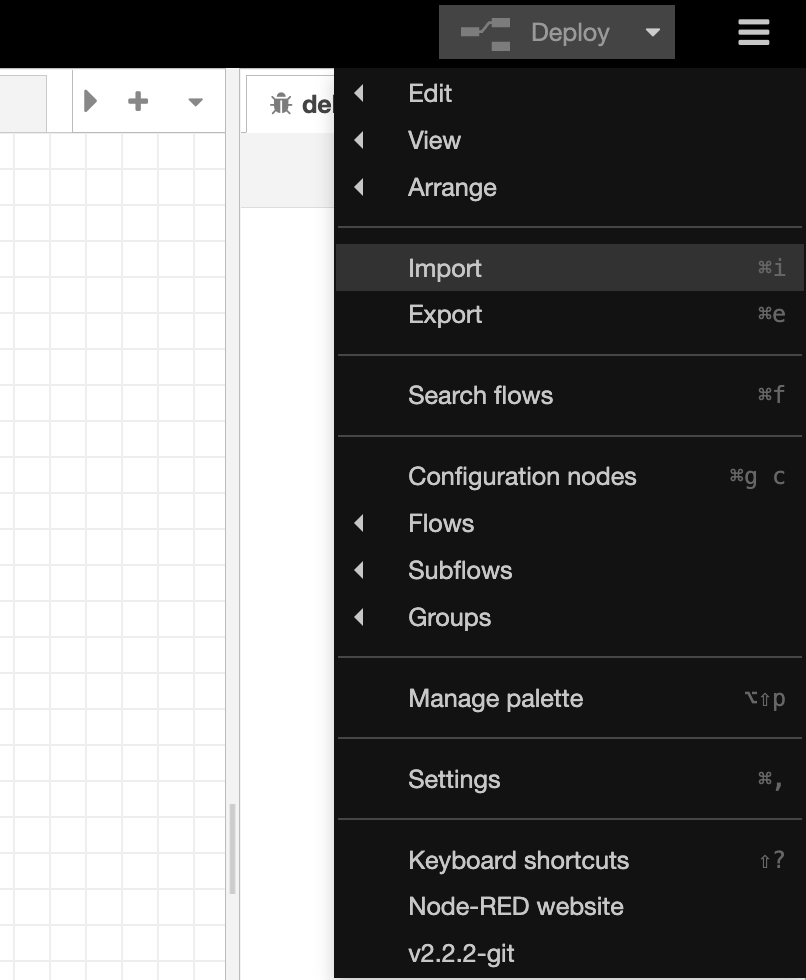
Click on the hamburger menu (the three horizontal lines) at the top right of the Node-Red toolbar beside the Deploy button and click import:
The import option in the menu
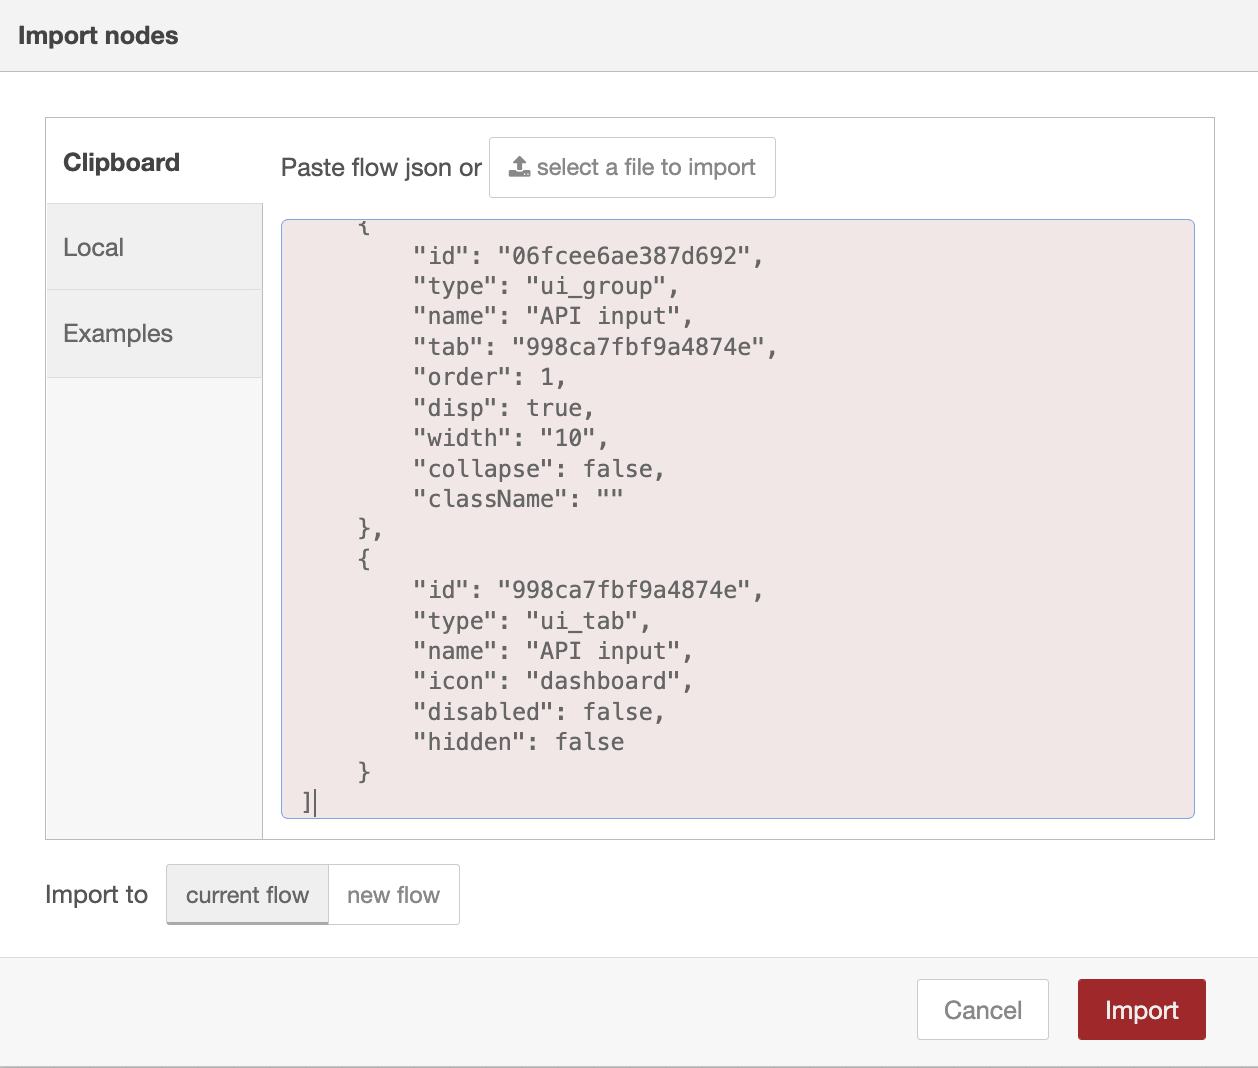
Then choose Clipboard, and copy-paste the code from further down in this page into the box, then click the redImport button:
Importing a flow
The pre-made flows will automatically be imported, and you can begin using them immediately!
Here is the flow for allowing the access token and company id to be added via the UI:
[
{
"id": "b75bc4b72628cada",
"type": "tab",
"label": "Access token and company id form input",
"disabled": false,
"info": "",
"env": []
},
{
"id": "6e7b243cd39c8a4c",
"type": "debug",
"z": "b75bc4b72628cada",
"name": "",
"active": true,
"tosidebar": true,
"console": false,
"tostatus": false,
"complete": "false",
"statusVal": "",
"statusType": "auto",
"x": 790,
"y": 180,
"wires": []
},
{
"id": "e72b136cad586d37",
"type": "ui_form",
"z": "b75bc4b72628cada",
"name": "",
"label": "Add access token and company id",
"group": "06fcee6ae387d692",
"order": 2,
"width": 0,
"height": 0,
"options": [
{
"label": "Access token",
"value": "accessToken",
"type": "text",
"required": true,
"rows": null
},
{
"label": "Company Id",
"value": "company",
"type": "text",
"required": true,
"rows": null
}
],
"formValue": {
"accessToken": "",
"company": ""
},
"payload": "",
"submit": "submit",
"cancel": "cancel",
"topic": "topic",
"topicType": "msg",
"splitLayout": "",
"className": "",
"x": 280,
"y": 180,
"wires": [
[
"34b1bcbf60442d15"
]
]
},
{
"id": "34b1bcbf60442d15",
"type": "function",
"z": "b75bc4b72628cada",
"name": "Set min and max globally",
"func": "global.set('accessToken', msg.payload.accessToken);\nglobal.set('company', msg.payload.company);\n\nreturn msg;",
"outputs": 1,
"noerr": 0,
"initialize": "",
"finalize": "",
"libs": [],
"x": 570,
"y": 180,
"wires": [
[
"6e7b243cd39c8a4c"
]
]
},
{
"id": "06fcee6ae387d692",
"type": "ui_group",
"name": "API input",
"tab": "998ca7fbf9a4874e",
"order": 1,
"disp": true,
"width": "10",
"collapse": false,
"className": ""
},
{
"id": "998ca7fbf9a4874e",
"type": "ui_tab",
"name": "API input",
"icon": "dashboard",
"disabled": false,
"hidden": false
}
]
Here is the flow for notarizing a certificate via an HTTP request:
[
{
"id": "d488a565739cd30d",
"type": "tab",
"label": "Notarize a certificate",
"disabled": false,
"info": "",
"env": []
},
{
"id": "74c1b8cc0b04a883",
"type": "inject",
"z": "d488a565739cd30d",
"name": "Get identity",
"props": [
{
"p": "payload"
}
],
"repeat": "",
"crontab": "",
"once": false,
"onceDelay": 0.1,
"topic": "",
"payload": "",
"payloadType": "date",
"x": 250,
"y": 180,
"wires": [
[
"527fef1cc3fdf212"
]
]
},
{
"id": "41f414248e330cc5",
"type": "comment",
"z": "d488a565739cd30d",
"name": "Get the first identity returned",
"info": "",
"x": 280,
"y": 140,
"wires": []
},
{
"id": "04778e50b7b47ce3",
"type": "inject",
"z": "d488a565739cd30d",
"name": "Notarize certificate",
"props": [
{
"p": "payload"
}
],
"repeat": "",
"crontab": "",
"once": false,
"onceDelay": 0.1,
"topic": "",
"payload": "",
"payloadType": "date",
"x": 270,
"y": 480,
"wires": [
[
"208b8472dc6bb05b"
]
]
},
{
"id": "715c915d57ab08d1",
"type": "debug",
"z": "d488a565739cd30d",
"name": "",
"active": true,
"tosidebar": true,
"console": false,
"tostatus": false,
"complete": "payload",
"targetType": "msg",
"statusVal": "",
"statusType": "auto",
"x": 830,
"y": 560,
"wires": []
},
{
"id": "5ed48edbd94b6d11",
"type": "comment",
"z": "d488a565739cd30d",
"name": "Notarize a Certificate - needs access token, company and identity",
"info": "",
"x": 400,
"y": 440,
"wires": []
},
{
"id": "208b8472dc6bb05b",
"type": "function",
"z": "d488a565739cd30d",
"name": "Get certificate",
"func": "const certificate = global.get('certificate');\nif (certificate) {\n msg.payload = certificate;\n return msg;\n} else {\n node.warn('No certificate found, please upload a JSON certificate via the UI');\n}\n",
"outputs": 1,
"noerr": 0,
"initialize": "",
"finalize": "",
"libs": [],
"x": 480,
"y": 480,
"wires": [
[
"6e53706f40de996a"
]
]
},
{
"id": "527fef1cc3fdf212",
"type": "function",
"z": "d488a565739cd30d",
"name": "Set access token header",
"func": "const accessToken = global.get('accessToken');\n\nif (accessToken) {\n msg.headers = {\n Authorization: `Bearer ${accessToken}`,\n }\n return msg;\n} else {\n node.warn('No access token, please add your accessToken via the ui');\n}\n\n\n",
"outputs": 1,
"noerr": 0,
"initialize": "",
"finalize": "",
"libs": [],
"x": 470,
"y": 180,
"wires": [
[
"156bf621c10d276e"
]
]
},
{
"id": "156bf621c10d276e",
"type": "function",
"z": "d488a565739cd30d",
"name": "Set company header",
"func": "const company = global.get('company');\n\nif (company) {\n msg.headers = Object.assign(msg.headers, {\n company: company,\n })\n return msg;\n} else {\n node.warn('No company available, please set the company id via the ui');\n}\n",
"outputs": 1,
"noerr": 0,
"initialize": "",
"finalize": "",
"libs": [],
"x": 720,
"y": 180,
"wires": [
[
"9d3dfced379be94e"
]
]
},
{
"id": "9d3dfced379be94e",
"type": "http request",
"z": "d488a565739cd30d",
"name": "",
"method": "GET",
"ret": "txt",
"paytoqs": "ignore",
"url": "http://app.s1seven.ovh/api/identities?mode=test",
"tls": "",
"persist": false,
"proxy": "",
"authType": "",
"senderr": false,
"x": 250,
"y": 260,
"wires": [
[
"34ea2849c3e6e5a3"
]
]
},
{
"id": "34ea2849c3e6e5a3",
"type": "json",
"z": "d488a565739cd30d",
"name": "",
"property": "payload",
"action": "",
"pretty": false,
"x": 410,
"y": 260,
"wires": [
[
"5e1303e3f3728e06"
]
]
},
{
"id": "5e1303e3f3728e06",
"type": "function",
"z": "d488a565739cd30d",
"name": "Set global.identity to identity",
"func": "if (Array.isArray(msg.payload) && msg.payload[0].id) {\n global.set('identity', msg.payload[0].id)\n} else if (msg.statusCode === 401) {\n node.warn('Please ensure your access token is valid')\n} else if (msg.statusCode !== 200) {\n node.warn('Something went wrong. Is your company id valid?')\n}\n\nreturn msg;",
"outputs": 1,
"noerr": 0,
"initialize": "",
"finalize": "",
"libs": [],
"x": 620,
"y": 260,
"wires": [
[
"fbcb819073f1c992"
]
]
},
{
"id": "fbcb819073f1c992",
"type": "debug",
"z": "d488a565739cd30d",
"name": "",
"active": true,
"tosidebar": true,
"console": false,
"tostatus": false,
"complete": "payload",
"targetType": "msg",
"statusVal": "",
"statusType": "auto",
"x": 850,
"y": 260,
"wires": []
},
{
"id": "6e53706f40de996a",
"type": "function",
"z": "d488a565739cd30d",
"name": "Set access token header",
"func": "const accessToken = global.get('accessToken');\nconst company = global.get('company');\n\nif (accessToken) {\n msg.headers = {\n Authorization: `Bearer ${accessToken}`,\n }\n} else {\n node.warn('No access token, please add one via the UI');\n}\n\nif (company) {\n msg.headers = Object.assign(msg.headers, {\n company: company,\n })\n return msg;\n} else {\n node.warn('No company available, please add one via the UI');\n}\n\n\n",
"outputs": 1,
"noerr": 0,
"initialize": "",
"finalize": "",
"libs": [],
"x": 710,
"y": 480,
"wires": [
[
"642fbf192d4c89ca"
]
]
},
{
"id": "c03527bb7f5a4dad",
"type": "json",
"z": "d488a565739cd30d",
"name": "",
"property": "payload",
"action": "",
"pretty": false,
"x": 670,
"y": 560,
"wires": [
[
"715c915d57ab08d1"
]
]
},
{
"id": "642fbf192d4c89ca",
"type": "function",
"z": "d488a565739cd30d",
"name": "Get identity and set URL",
"func": "const identity = global.get('identity');\n\nif (identity) {\n msg.url = `https://app.s1seven.ovh/api/certificates/notarize?identity=${identity}&mode=test`\n\n return msg;\n} else {\n node.warn('No identity available, get the identity first');\n}\n\n\n",
"outputs": 1,
"noerr": 0,
"initialize": "",
"finalize": "",
"libs": [],
"x": 290,
"y": 560,
"wires": [
[
"a612f094da00a073"
]
]
},
{
"id": "a612f094da00a073",
"type": "http request",
"z": "d488a565739cd30d",
"name": "",
"method": "POST",
"ret": "txt",
"paytoqs": "ignore",
"url": "",
"tls": "",
"persist": false,
"proxy": "",
"authType": "",
"senderr": false,
"x": 510,
"y": 560,
"wires": [
[
"c03527bb7f5a4dad"
]
]
}
]
Conclusion
Click here for more ideas on what you can do with Node-Red and JSON certificates.
Click here for a simple, pre-made node that allows you to interact with the S1SEVEN API using a UI.

 Eamon O'Callaghan